如何仅在 Swift 中将一个视图控制器的方向锁定为纵向模式
How to lock orientation of one view controller to portrait mode only in Swift
自从我的应用程序获得了所有方向的支持。我只想将纵向模式锁定到特定的 UIViewController。
例如假设它是选项卡式应用程序,当登录视图以模态方式出现时,无论用户如何旋转设备或当前设备方向如何,我只希望登录视图为纵向模式
添加此代码以强制纵向并锁定它:
override func viewDidLoad() {
    super.viewDidLoad()

    // Force the device in portrait mode when the view controller gets loaded
    UIDevice.currentDevice().setValue(UIInterfaceOrientation.Portrait.rawValue, forKey: "orientation")
}

override func shouldAutorotate() -> Bool {
    // Lock autorotate
    return false
}

override func supportedInterfaceOrientations() -> Int {

    // Only allow Portrait
    return Int(UIInterfaceOrientationMask.Portrait.rawValue)
}

override func preferredInterfaceOrientationForPresentation() -> UIInterfaceOrientation {

    // Only allow Portrait
    return UIInterfaceOrientation.Portrait
}
在您的 AppDelegate 中 - 将 supportedInterfaceOrientationsForWindow 设置为您希望整个应用程序支持的任何方向:
func application(application: UIApplication, supportedInterfaceOrientationsForWindow window: UIWindow?) -> UIInterfaceOrientationMask {
    return UIInterfaceOrientationMask.All
}
要将横向方向设置为您应用的所有视图并只允许一个视图到所有方向(例如能够添加相机胶卷):
在AppDelegate.swift中:
var adaptOrientation = false
在:didFinishLaunchingWithOptions
NSNotificationCenter.defaultCenter().addObserver(self, selector: "adaptOrientationAction:", name:"adaptOrientationAction", object: nil)
AppDelegate.swift 的其他地方:
func application(application: UIApplication, supportedInterfaceOrientationsForWindow window: UIWindow?) -> Int {
    return checkOrientation(self.window?.rootViewController)
}

func checkOrientation(viewController:UIViewController?)-> Int{
    if (adaptOrientation == false){
        return Int(UIInterfaceOrientationMask.Landscape.rawValue)
    }else {
        return Int(UIInterfaceOrientationMask.All.rawValue)
    }
}

func adaptOrientationAction(notification: NSNotification){
    if adaptOrientation == false {
        adaptOrientation = true
    }else {
        adaptOrientation = false
    }
}
然后在视图中转到您希望能够拥有所有方向的视图:
override func prepareForSegue(segue: UIStoryboardSegue, sender: AnyObject!) {
    if (segue.identifier == "YOURSEGUE") {
        NSNotificationCenter.defaultCenter().postNotificationName("adaptOrientationAction", object: nil)
    }
}

override func viewWillAppear(animated: Bool) {
    if adaptOrientation == true {
        NSNotificationCenter.defaultCenter().postNotificationName("adaptOrientationAction", object: nil)
    }
}
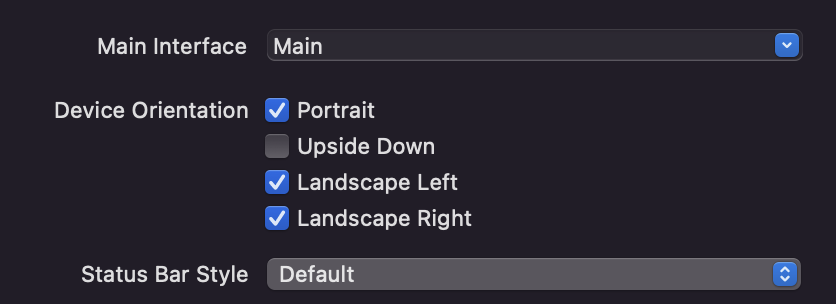
最后一件事是勾选设备方向:
- 肖像
- 横向左
- 横向右
当你有一个复杂的视图层次结构时,事情会变得非常混乱,比如有多个导航控制器 and/or 选项卡视图控制器。
此实现将其放在各个视图控制器上以设置它们何时想要锁定方向,而不是依赖 App Delegate 通过遍历子视图来找到它们。
Swift 3, 4, 5
在 AppDelegate 中:
/// set orientations you want to be allowed in this property by default
var orientationLock = UIInterfaceOrientationMask.all

func application(_ application: UIApplication, supportedInterfaceOrientationsFor window: UIWindow?) -> UIInterfaceOrientationMask {
        return self.orientationLock
}
在其他一些全局结构或助手 class 中,我在这里创建了 AppUtility:
struct AppUtility {

    static func lockOrientation(_ orientation: UIInterfaceOrientationMask) {

        if let delegate = UIApplication.shared.delegate as? AppDelegate {
            delegate.orientationLock = orientation
        }
    }

    /// OPTIONAL Added method to adjust lock and rotate to the desired orientation
    static func lockOrientation(_ orientation: UIInterfaceOrientationMask, andRotateTo rotateOrientation:UIInterfaceOrientation) {

        self.lockOrientation(orientation)

        UIDevice.current.setValue(rotateOrientation.rawValue, forKey: "orientation")
        UINavigationController.attemptRotationToDeviceOrientation()
    }

}
然后在想要的ViewController中锁定方向:
 override func viewWillAppear(_ animated: Bool) {
    super.viewWillAppear(animated)

    AppUtility.lockOrientation(.portrait)
    // Or to rotate and lock
    // AppUtility.lockOrientation(.portrait, andRotateTo: .portrait)

}

override func viewWillDisappear(_ animated: Bool) {
    super.viewWillDisappear(animated)

    // Don't forget to reset when view is being removed
    AppUtility.lockOrientation(.all)
}
如果iPad或通用应用程序
确保在目标设置 -> 常规 -> 部署信息中选中“需要全屏”。 supportedInterfaceOrientationsFor 如果未选中,则不会调用委托。
bmjohns -> 你是我的救星。这是唯一可行的解决方案(使用 AppUtility 结构)
我创建了这个 class:
class Helper{
    struct AppUtility {

        static func lockOrientation(_ orientation: UIInterfaceOrientationMask) {

            if let delegate = UIApplication.shared.delegate as? AppDelegate {
                delegate.orientationLock = orientation
            }
        }

        /// OPTIONAL Added method to adjust lock and rotate to the desired orientation
        static func lockOrientation(_ orientation: UIInterfaceOrientationMask, andRotateTo rotateOrientation:UIInterfaceOrientation) {

            self.lockOrientation(orientation)

            UIDevice.current.setValue(rotateOrientation.rawValue, forKey: "orientation")
        }

    }
}
并按照您的说明进行操作,一切都适用于 Swift 3 -> xcode 版本 8.2.1
此线程中有很多很棒的答案,但 none 非常符合我的需求。我有一个选项卡式应用程序,每个选项卡中都有导航控制器,一个视图需要旋转,而其他视图需要纵向锁定。出于某种原因,导航控制器没有正确调整其子视图的大小。通过结合 this 答案找到解决方案(在 Swift 3 中),布局问题消失了。按照@bmjohns 的建议创建结构:
import UIKit

struct OrientationLock {

    static func lock(to orientation: UIInterfaceOrientationMask) {
        if let delegate = UIApplication.shared.delegate as? AppDelegate {
            delegate.orientationLock = orientation
        }
    }

    static func lock(to orientation: UIInterfaceOrientationMask, andRotateTo rotateOrientation: UIInterfaceOrientation) {
        self.lock(to: orientation)
        UIDevice.current.setValue(rotateOrientation.rawValue, forKey: "orientation")
    }
}
然后子class UITabBarController:
    import UIKit

class TabBarController: UITabBarController, UITabBarControllerDelegate {
    required init?(coder aDecoder: NSCoder) {
        super.init(coder: aDecoder)
        self.delegate = self
    }

    func tabBarControllerSupportedInterfaceOrientations(_ tabBarController: UITabBarController) -> UIInterfaceOrientationMask {
        if tabBarController.selectedViewController is MyViewControllerNotInANavigationControllerThatShouldRotate {
            return .allButUpsideDown
        } else if let navController = tabBarController.selectedViewController as? UINavigationController, navController.topViewController is MyViewControllerInANavControllerThatShouldRotate {
            return .allButUpsideDown
        } else {
            //Lock view that should not be able to rotate
            return .portrait
        }
    }

    func tabBarController(_ tabBarController: UITabBarController, shouldSelect viewController: UIViewController) -> Bool {
        if viewController is MyViewControllerNotInANavigationControllerThatShouldRotate {
            OrientationLock.lock(to: .allButUpsideDown)
        } else if let navController = viewController as? UINavigationController, navController.topViewController is MyViewControllerInANavigationControllerThatShouldRotate {
            OrientationLock.lock(to: .allButUpsideDown)
        } else {
            //Lock orientation and rotate to desired orientation
            OrientationLock.lock(to: .portrait, andRotateTo: .portrait)
        }
        return true
    }
}
不要忘记将 Storyboard 中 TabBarController 的 class 更改为新创建的子 class。
这是针对您的问题和其他相关问题的通用解决方案。
1.创建辅助 class UIHelper 并放置以下方法:
    /**This method returns top view controller in application  */
    class func topViewController() -> UIViewController?
    {
        let helper = UIHelper()
        return helper.topViewControllerWithRootViewController(rootViewController: UIApplication.shared.keyWindow?.rootViewController)
    }

    /**This is a recursive method to select the top View Controller in a app, either with TabBarController or not */
    private func topViewControllerWithRootViewController(rootViewController:UIViewController?) -> UIViewController?
    {
        if(rootViewController != nil)
        {
            // UITabBarController
            if let tabBarController = rootViewController as? UITabBarController,
                let selectedViewController = tabBarController.selectedViewController {
                return self.topViewControllerWithRootViewController(rootViewController: selectedViewController)
            }

            // UINavigationController
            if let navigationController = rootViewController as? UINavigationController ,let visibleViewController = navigationController.visibleViewController {
                return self.topViewControllerWithRootViewController(rootViewController: visibleViewController)
            }

            if ((rootViewController!.presentedViewController) != nil) {
                let presentedViewController = rootViewController!.presentedViewController;
                return self.topViewControllerWithRootViewController(rootViewController: presentedViewController!);
            }else
            {
                return rootViewController
            }
        }

        return nil
    }
2。根据您的期望行为创建一个协议,对于您的特定情况将是纵向的。
协议 orientationIsOnlyPortrait {}
注意:如果需要,请将其添加到 UIHelper 的顶部 Class。
3。扩展你的视图控制器
你的情况:
class Any_ViewController: UIViewController,orientationIsOnlyPortrait {

   ....

}
4.在应用程序委托 class 中添加此方法:
 func application(_ application: UIApplication, supportedInterfaceOrientationsFor window: UIWindow?) -> UIInterfaceOrientationMask {
        let presentedViewController = UIHelper.topViewController()
        if presentedViewController is orientationIsOnlyPortrait {
            return .portrait
        }
        return .all
    }
最后的笔记:
- 如果您有更多 class 处于纵向模式,只需扩展它
协议。
- 如果您想要视图控制器的其他行为,请创建其他协议并遵循相同的结构。
- 这个例子解决了推送后方向改变的问题
视图控制器
感谢@bmjohn 上面的回答。这是该答案代码的工作 Xamarin / C# 版本,以节省其他人的转录时间:
AppDelegate.cs
 public UIInterfaceOrientationMask OrientationLock = UIInterfaceOrientationMask.All;
 public override UIInterfaceOrientationMask GetSupportedInterfaceOrientations(UIApplication application, UIWindow forWindow)
 {
     return this.OrientationLock;
 }
静态OrientationUtility.csclass:
public static class OrientationUtility
{
    public static void LockOrientation(UIInterfaceOrientationMask orientation)
    {
        var appdelegate = (AppDelegate) UIApplication.SharedApplication.Delegate;
        if(appdelegate != null)
        {
            appdelegate.OrientationLock = orientation;
        }
    }

    public static void LockOrientation(UIInterfaceOrientationMask orientation, UIInterfaceOrientation RotateToOrientation)
    {
        LockOrientation(orientation);

        UIDevice.CurrentDevice.SetValueForKey(new NSNumber((int)RotateToOrientation), new NSString("orientation"));
    }
}
视图控制器:
    public override void ViewDidAppear(bool animated)
    {
       base.ViewWillAppear(animated);
       OrientationUtility.LockOrientation(UIInterfaceOrientationMask.Portrait, UIInterfaceOrientation.Portrait);
    }

    public override void ViewWillDisappear(bool animated)
    {
        base.ViewWillDisappear(animated);
        OrientationUtility.LockOrientation(UIInterfaceOrientationMask.All);
    }
从 iOS 10 和 11 开始,iPad 支持侧拉和拆分视图。要在 Slide Over 和 Split View 中启用应用,必须取消选中 Requires full screen 。这意味着无法使用已接受的答案 if 该应用程序想要支持 Slide Over 和 Split View。在 iPad here.
上查看 Apple 采用多任务处理增强功能的更多信息
我有一个解决方案允许 (1) 取消选中 Requires full screen,(2) 在 appDelegate 中只实现一个功能(特别是如果您不想/不能修改目标视图控制器),以及(3)避免递归调用。不需要助手 class 也不需要扩展。
appDelegate.swift (Swift 4)
func application(_ application: UIApplication,
                 supportedInterfaceOrientationsFor window: UIWindow?) -> UIInterfaceOrientationMask {
    // Search for the visible view controller
    var vc = window?.rootViewController
    // Dig through tab bar and navigation, regardless their order
    while (vc is UITabBarController) || (vc is UINavigationController) {
        if let c = vc as? UINavigationController {
            vc = c.topViewController
        } else if let c = vc as? UITabBarController {
            vc = c.selectedViewController
        }
    }
    // Look for model view controller
    while (vc?.presentedViewController) != nil {
        vc = vc!.presentedViewController
    }
    print("vc = " + (vc != nil ? String(describing: type(of: vc!)) : "nil"))
    // Final check if it's our target class.  Also make sure it isn't exiting.
    // Otherwise, system will mistakenly rotate the presentingViewController.
    if (vc is TargetViewController) && !(vc!.isBeingDismissed) {
        return [.portrait]
    }
    return [.all]
}
编辑
@bmjohns 指出 iPad 上没有调用此函数。我验证了,是的,它没有被调用。所以,我做了更多的测试并发现了一些事实:
- 我取消选中
Requires full screen,因为我想在 iPad 上启用侧滑和侧滑视图。这要求应用程序支持 iPad 的所有 4 个方向,在 Info.plist 中:Supported interface orientations (iPad)。
我的应用程序与 Facebook 的工作方式相同:在 iPhone 上,大部分时间它被锁定为纵向。全屏查看图像时,允许用户旋转横向以获得更好的视图。在 iPad 上,用户可以在任何视图控制器中旋转到任何方向。因此,当 iPad 站在 Smart Cover 上(横向左侧)时,应用程序看起来不错。
为了iPad调用application(_:supportedInterfaceOrientationsFor),在Info.plist中,只保留肖像iPad。该应用程序将失去 Slide Over + Split View 功能。但是您可以在一个地方锁定或解锁任何视图控制器的方向,无需修改 ViewController class.
最后,当视图为 displayed/removed 时,此函数在视图控制器的生命周期中被调用。如果您的应用在其他时间需要 lock/unlock/change 方向,它可能无法工作
Swift 4/5
var orientationLock = UIInterfaceOrientationMask.all

func application(_ application: UIApplication, supportedInterfaceOrientationsFor window: UIWindow?) -> UIInterfaceOrientationMask {
    return self.orientationLock
}
struct AppUtility {
    static func lockOrientation(_ orientation: UIInterfaceOrientationMask) {
        if let delegate = UIApplication.shared.delegate as? AppDelegate {
            delegate.orientationLock = orientation
        }
    }

    static func lockOrientation(_ orientation: UIInterfaceOrientationMask, andRotateTo rotateOrientation:UIInterfaceOrientation) {
        self.lockOrientation(orientation)
        UIDevice.current.setValue(rotateOrientation.rawValue, forKey: "orientation")
    }
}
你的ViewController
如果您只需要纵向,请添加以下行。您必须将此应用于所有 ViewController 需要显示纵向模式。
override func viewWillAppear(_ animated: Bool) {
    AppDelegate.AppUtility.lockOrientation(UIInterfaceOrientationMask.portrait, andRotateTo: UIInterfaceOrientation.portrait)
}
和
这将使其他人的屏幕方向 Viewcontroller 根据设备的物理方向。
override func viewWillDisappear(_ animated: Bool) {
    AppDelegate.AppUtility.lockOrientation(UIInterfaceOrientationMask.all)
}
使用
创建新扩展
import UIKit

extension UINavigationController {
    override open var supportedInterfaceOrientations: UIInterfaceOrientationMask {
        return .portrait
    }
}

extension UITabBarController {
    override open var supportedInterfaceOrientations: UIInterfaceOrientationMask {
        return .portrait
    }
}
实际测试的解决方案。在我的示例中,我需要我的整个应用程序应处于纵向模式,但只有一个屏幕的方向应处于横向模式。
AppDelegate 中的代码如上述答案所述。
var orientationLock = UIInterfaceOrientationMask.all

func application(_ application: UIApplication, supportedInterfaceOrientationsFor window: UIWindow?) -> UIInterfaceOrientationMask
{
  return self.orientationLock
}
struct AppUtility {

static func lockOrientation(_ orientation: UIInterfaceOrientationMask) {
    if let delegate = UIApplication.shared.delegate as? AppDelegate {
        delegate.orientationLock = orientation
    }
}
static func lockOrientation(_ orientation: UIInterfaceOrientationMask, andRotateTo rotateOrientation:UIInterfaceOrientation) {
self.lockOrientation(orientation)
UIDevice.current.setValue(rotateOrientation.rawValue, forKey: "orientation")
}
}
然后在横向 viewcontroller 变为 presented/push 之前写下这段代码。
override func viewWillAppear(_ animated: Bool) {
super.viewWillAppear(animated)
AppDelegate.AppUtility.lockOrientation(UIInterfaceOrientationMask.portrait, andRotateTo: UIInterfaceOrientation.portrait)
}
然后实际写下这段代码viewcontroller(横屏)
override func viewWillAppear(_ animated: Bool) {
super.viewWillAppear(animated)
AppDelegate.AppUtility.lockOrientation(UIInterfaceOrientationMask.landscape, andRotateTo: UIInterfaceOrientation.landscape)
}
Swift 3 & 4
像这样设置特定 UIViewController 的 supportedInterfaceOrientations 属性:
class MyViewController: UIViewController {

    var orientations = UIInterfaceOrientationMask.portrait //or what orientation you want
    override var supportedInterfaceOrientations : UIInterfaceOrientationMask {
    get { return self.orientations }
    set { self.orientations = newValue }
    }

    override func viewDidLoad() {
        super.viewDidLoad()
    }

    //...
}
更新
只有当您的 viewController 而不是 嵌入 UINavigationController 时,此解决方案才有效,因为方向继承自父 viewController。
对于这种情况,您可以创建 UINavigationViewController 的子类并在其上设置这些属性。
这是一个适用于 Swift 4.2 (iOS 12.2) 的简单方法,将其放入要禁用 shouldAutorotate 的 UIViewController 中:
override var supportedInterfaceOrientations: UIInterfaceOrientationMask {
    return .portrait
}
.portrait 部分告诉它要保持哪个方向,您可以根据需要更改它。选项有:.portrait、.all、.allButUpsideDown、.landscape、.landscapeLeft、.landscapeRight、.portraitUpsideDown、
我做了一些实验,并设法找到了解决这个问题的完美方法。
该方法基于通过 view->tag
进行的视图标记
在目标 ViewController 中,只需将标签分配给根视图,如以下代码示例所示:
class MyViewController: BaseViewController {

  // declare unique view tag identifier
  static let ViewTag = 2105981;

  override func viewDidLoad()
  {
    super.viewDidLoad();
    // assign the value to the current root view
    self.view.tag = MyViewController.ViewTag;
  }
最后在 AppDelegate.swift 检查当前显示的视图是否是我们标记的视图:
func application(_ application: UIApplication, supportedInterfaceOrientationsFor window: UIWindow?) -> UIInterfaceOrientationMask
{
    if (window?.viewWithTag(DesignerController.ViewTag)) != nil {
        return .portrait;
    }
    return .all;
}
这种方法已经在我的模拟器上进行了测试,似乎工作正常。
注意: 如果当前 MVC 与导航堆栈中的某个子 ViewController 重叠,也会找到标记的视图。
对于 Swift 的新版本试试这个
override var shouldAutorotate: Bool {
    return false
}

override var supportedInterfaceOrientations: UIInterfaceOrientationMask {
    return UIInterfaceOrientationMask.portrait
}

override var preferredInterfaceOrientationForPresentation: UIInterfaceOrientation {
    return UIInterfaceOrientation.portrait
}
纵向和横向锁定和更改方向的最佳解决方案:
在 YouTube 上观看此视频:
https://m.youtube.com/watch?v=4vRrHdBowyo
这个教程最好而且简单。
或使用以下代码:
See this picture
// 1- 在第二个 viewcontroller 中我们设置 landscapeleft,在第一个 viewcontroller 中我们设置 portrat:
// 2- 如果你使用 NavigationController,你应该添加扩展
import UIKit

class SecondViewController: UIViewController {


    override func viewWillAppear(_ animated: Bool) {
        super.viewWillAppear(animated)
        UIDevice.current.setValue(UIInterfaceOrientation.landscapeLeft.rawValue, forKey: "orientation")
    }

    override open var shouldAutorotate: Bool {
        return false
    }

    override open var supportedInterfaceOrientations: UIInterfaceOrientationMask {
        return .landscapeLeft
    }

    override var preferredInterfaceOrientationForPresentation: UIInterfaceOrientation {
        return .landscapeLeft
    }


    override func viewDidLoad() {
        super.viewDidLoad()
    }

//write The rest of your code in here


}

//if you use NavigationController, you should add this extension

extension UINavigationController {
    override open var supportedInterfaceOrientations: UIInterfaceOrientationMask {
        return topViewController?.supportedInterfaceOrientations ?? .allButUpsideDown

    }
}
自从我的应用程序获得了所有方向的支持。我只想将纵向模式锁定到特定的 UIViewController。
例如假设它是选项卡式应用程序,当登录视图以模态方式出现时,无论用户如何旋转设备或当前设备方向如何,我只希望登录视图为纵向模式
添加此代码以强制纵向并锁定它:
override func viewDidLoad() {
super.viewDidLoad()
// Force the device in portrait mode when the view controller gets loaded
UIDevice.currentDevice().setValue(UIInterfaceOrientation.Portrait.rawValue, forKey: "orientation")
}
override func shouldAutorotate() -> Bool {
// Lock autorotate
return false
}
override func supportedInterfaceOrientations() -> Int {
// Only allow Portrait
return Int(UIInterfaceOrientationMask.Portrait.rawValue)
}
override func preferredInterfaceOrientationForPresentation() -> UIInterfaceOrientation {
// Only allow Portrait
return UIInterfaceOrientation.Portrait
}
在您的 AppDelegate 中 - 将 supportedInterfaceOrientationsForWindow 设置为您希望整个应用程序支持的任何方向:
func application(application: UIApplication, supportedInterfaceOrientationsForWindow window: UIWindow?) -> UIInterfaceOrientationMask {
return UIInterfaceOrientationMask.All
}
要将横向方向设置为您应用的所有视图并只允许一个视图到所有方向(例如能够添加相机胶卷):
在AppDelegate.swift中:
var adaptOrientation = false
在:didFinishLaunchingWithOptions
NSNotificationCenter.defaultCenter().addObserver(self, selector: "adaptOrientationAction:", name:"adaptOrientationAction", object: nil)
AppDelegate.swift 的其他地方:
func application(application: UIApplication, supportedInterfaceOrientationsForWindow window: UIWindow?) -> Int {
return checkOrientation(self.window?.rootViewController)
}
func checkOrientation(viewController:UIViewController?)-> Int{
if (adaptOrientation == false){
return Int(UIInterfaceOrientationMask.Landscape.rawValue)
}else {
return Int(UIInterfaceOrientationMask.All.rawValue)
}
}
func adaptOrientationAction(notification: NSNotification){
if adaptOrientation == false {
adaptOrientation = true
}else {
adaptOrientation = false
}
}
然后在视图中转到您希望能够拥有所有方向的视图:
override func prepareForSegue(segue: UIStoryboardSegue, sender: AnyObject!) {
if (segue.identifier == "YOURSEGUE") {
NSNotificationCenter.defaultCenter().postNotificationName("adaptOrientationAction", object: nil)
}
}
override func viewWillAppear(animated: Bool) {
if adaptOrientation == true {
NSNotificationCenter.defaultCenter().postNotificationName("adaptOrientationAction", object: nil)
}
}
最后一件事是勾选设备方向: - 肖像 - 横向左 - 横向右
当你有一个复杂的视图层次结构时,事情会变得非常混乱,比如有多个导航控制器 and/or 选项卡视图控制器。
此实现将其放在各个视图控制器上以设置它们何时想要锁定方向,而不是依赖 App Delegate 通过遍历子视图来找到它们。
Swift 3, 4, 5
在 AppDelegate 中:
/// set orientations you want to be allowed in this property by default
var orientationLock = UIInterfaceOrientationMask.all
func application(_ application: UIApplication, supportedInterfaceOrientationsFor window: UIWindow?) -> UIInterfaceOrientationMask {
return self.orientationLock
}
在其他一些全局结构或助手 class 中,我在这里创建了 AppUtility:
struct AppUtility {
static func lockOrientation(_ orientation: UIInterfaceOrientationMask) {
if let delegate = UIApplication.shared.delegate as? AppDelegate {
delegate.orientationLock = orientation
}
}
/// OPTIONAL Added method to adjust lock and rotate to the desired orientation
static func lockOrientation(_ orientation: UIInterfaceOrientationMask, andRotateTo rotateOrientation:UIInterfaceOrientation) {
self.lockOrientation(orientation)
UIDevice.current.setValue(rotateOrientation.rawValue, forKey: "orientation")
UINavigationController.attemptRotationToDeviceOrientation()
}
}
然后在想要的ViewController中锁定方向:
override func viewWillAppear(_ animated: Bool) {
super.viewWillAppear(animated)
AppUtility.lockOrientation(.portrait)
// Or to rotate and lock
// AppUtility.lockOrientation(.portrait, andRotateTo: .portrait)
}
override func viewWillDisappear(_ animated: Bool) {
super.viewWillDisappear(animated)
// Don't forget to reset when view is being removed
AppUtility.lockOrientation(.all)
}
如果iPad或通用应用程序
确保在目标设置 -> 常规 -> 部署信息中选中“需要全屏”。 supportedInterfaceOrientationsFor 如果未选中,则不会调用委托。
bmjohns -> 你是我的救星。这是唯一可行的解决方案(使用 AppUtility 结构)
我创建了这个 class:
class Helper{
struct AppUtility {
static func lockOrientation(_ orientation: UIInterfaceOrientationMask) {
if let delegate = UIApplication.shared.delegate as? AppDelegate {
delegate.orientationLock = orientation
}
}
/// OPTIONAL Added method to adjust lock and rotate to the desired orientation
static func lockOrientation(_ orientation: UIInterfaceOrientationMask, andRotateTo rotateOrientation:UIInterfaceOrientation) {
self.lockOrientation(orientation)
UIDevice.current.setValue(rotateOrientation.rawValue, forKey: "orientation")
}
}
}
并按照您的说明进行操作,一切都适用于 Swift 3 -> xcode 版本 8.2.1
此线程中有很多很棒的答案,但 none 非常符合我的需求。我有一个选项卡式应用程序,每个选项卡中都有导航控制器,一个视图需要旋转,而其他视图需要纵向锁定。出于某种原因,导航控制器没有正确调整其子视图的大小。通过结合 this 答案找到解决方案(在 Swift 3 中),布局问题消失了。按照@bmjohns 的建议创建结构:
import UIKit
struct OrientationLock {
static func lock(to orientation: UIInterfaceOrientationMask) {
if let delegate = UIApplication.shared.delegate as? AppDelegate {
delegate.orientationLock = orientation
}
}
static func lock(to orientation: UIInterfaceOrientationMask, andRotateTo rotateOrientation: UIInterfaceOrientation) {
self.lock(to: orientation)
UIDevice.current.setValue(rotateOrientation.rawValue, forKey: "orientation")
}
}
然后子class UITabBarController:
import UIKit
class TabBarController: UITabBarController, UITabBarControllerDelegate {
required init?(coder aDecoder: NSCoder) {
super.init(coder: aDecoder)
self.delegate = self
}
func tabBarControllerSupportedInterfaceOrientations(_ tabBarController: UITabBarController) -> UIInterfaceOrientationMask {
if tabBarController.selectedViewController is MyViewControllerNotInANavigationControllerThatShouldRotate {
return .allButUpsideDown
} else if let navController = tabBarController.selectedViewController as? UINavigationController, navController.topViewController is MyViewControllerInANavControllerThatShouldRotate {
return .allButUpsideDown
} else {
//Lock view that should not be able to rotate
return .portrait
}
}
func tabBarController(_ tabBarController: UITabBarController, shouldSelect viewController: UIViewController) -> Bool {
if viewController is MyViewControllerNotInANavigationControllerThatShouldRotate {
OrientationLock.lock(to: .allButUpsideDown)
} else if let navController = viewController as? UINavigationController, navController.topViewController is MyViewControllerInANavigationControllerThatShouldRotate {
OrientationLock.lock(to: .allButUpsideDown)
} else {
//Lock orientation and rotate to desired orientation
OrientationLock.lock(to: .portrait, andRotateTo: .portrait)
}
return true
}
}
不要忘记将 Storyboard 中 TabBarController 的 class 更改为新创建的子 class。
这是针对您的问题和其他相关问题的通用解决方案。
1.创建辅助 class UIHelper 并放置以下方法:
/**This method returns top view controller in application */
class func topViewController() -> UIViewController?
{
let helper = UIHelper()
return helper.topViewControllerWithRootViewController(rootViewController: UIApplication.shared.keyWindow?.rootViewController)
}
/**This is a recursive method to select the top View Controller in a app, either with TabBarController or not */
private func topViewControllerWithRootViewController(rootViewController:UIViewController?) -> UIViewController?
{
if(rootViewController != nil)
{
// UITabBarController
if let tabBarController = rootViewController as? UITabBarController,
let selectedViewController = tabBarController.selectedViewController {
return self.topViewControllerWithRootViewController(rootViewController: selectedViewController)
}
// UINavigationController
if let navigationController = rootViewController as? UINavigationController ,let visibleViewController = navigationController.visibleViewController {
return self.topViewControllerWithRootViewController(rootViewController: visibleViewController)
}
if ((rootViewController!.presentedViewController) != nil) {
let presentedViewController = rootViewController!.presentedViewController;
return self.topViewControllerWithRootViewController(rootViewController: presentedViewController!);
}else
{
return rootViewController
}
}
return nil
}
2。根据您的期望行为创建一个协议,对于您的特定情况将是纵向的。
协议 orientationIsOnlyPortrait {}
注意:如果需要,请将其添加到 UIHelper 的顶部 Class。
3。扩展你的视图控制器
你的情况:
class Any_ViewController: UIViewController,orientationIsOnlyPortrait {
....
}
4.在应用程序委托 class 中添加此方法:
func application(_ application: UIApplication, supportedInterfaceOrientationsFor window: UIWindow?) -> UIInterfaceOrientationMask {
let presentedViewController = UIHelper.topViewController()
if presentedViewController is orientationIsOnlyPortrait {
return .portrait
}
return .all
}
最后的笔记:
- 如果您有更多 class 处于纵向模式,只需扩展它 协议。
- 如果您想要视图控制器的其他行为,请创建其他协议并遵循相同的结构。
- 这个例子解决了推送后方向改变的问题 视图控制器
感谢@bmjohn 上面的回答。这是该答案代码的工作 Xamarin / C# 版本,以节省其他人的转录时间:
AppDelegate.cs
public UIInterfaceOrientationMask OrientationLock = UIInterfaceOrientationMask.All;
public override UIInterfaceOrientationMask GetSupportedInterfaceOrientations(UIApplication application, UIWindow forWindow)
{
return this.OrientationLock;
}
静态OrientationUtility.csclass:
public static class OrientationUtility
{
public static void LockOrientation(UIInterfaceOrientationMask orientation)
{
var appdelegate = (AppDelegate) UIApplication.SharedApplication.Delegate;
if(appdelegate != null)
{
appdelegate.OrientationLock = orientation;
}
}
public static void LockOrientation(UIInterfaceOrientationMask orientation, UIInterfaceOrientation RotateToOrientation)
{
LockOrientation(orientation);
UIDevice.CurrentDevice.SetValueForKey(new NSNumber((int)RotateToOrientation), new NSString("orientation"));
}
}
视图控制器:
public override void ViewDidAppear(bool animated)
{
base.ViewWillAppear(animated);
OrientationUtility.LockOrientation(UIInterfaceOrientationMask.Portrait, UIInterfaceOrientation.Portrait);
}
public override void ViewWillDisappear(bool animated)
{
base.ViewWillDisappear(animated);
OrientationUtility.LockOrientation(UIInterfaceOrientationMask.All);
}
从 iOS 10 和 11 开始,iPad 支持侧拉和拆分视图。要在 Slide Over 和 Split View 中启用应用,必须取消选中 Requires full screen 。这意味着无法使用已接受的答案 if 该应用程序想要支持 Slide Over 和 Split View。在 iPad here.
我有一个解决方案允许 (1) 取消选中 Requires full screen,(2) 在 appDelegate 中只实现一个功能(特别是如果您不想/不能修改目标视图控制器),以及(3)避免递归调用。不需要助手 class 也不需要扩展。
appDelegate.swift (Swift 4)
func application(_ application: UIApplication,
supportedInterfaceOrientationsFor window: UIWindow?) -> UIInterfaceOrientationMask {
// Search for the visible view controller
var vc = window?.rootViewController
// Dig through tab bar and navigation, regardless their order
while (vc is UITabBarController) || (vc is UINavigationController) {
if let c = vc as? UINavigationController {
vc = c.topViewController
} else if let c = vc as? UITabBarController {
vc = c.selectedViewController
}
}
// Look for model view controller
while (vc?.presentedViewController) != nil {
vc = vc!.presentedViewController
}
print("vc = " + (vc != nil ? String(describing: type(of: vc!)) : "nil"))
// Final check if it's our target class. Also make sure it isn't exiting.
// Otherwise, system will mistakenly rotate the presentingViewController.
if (vc is TargetViewController) && !(vc!.isBeingDismissed) {
return [.portrait]
}
return [.all]
}
编辑
@bmjohns 指出 iPad 上没有调用此函数。我验证了,是的,它没有被调用。所以,我做了更多的测试并发现了一些事实:
- 我取消选中
Requires full screen,因为我想在 iPad 上启用侧滑和侧滑视图。这要求应用程序支持 iPad 的所有 4 个方向,在 Info.plist 中:Supported interface orientations (iPad)。
我的应用程序与 Facebook 的工作方式相同:在 iPhone 上,大部分时间它被锁定为纵向。全屏查看图像时,允许用户旋转横向以获得更好的视图。在 iPad 上,用户可以在任何视图控制器中旋转到任何方向。因此,当 iPad 站在 Smart Cover 上(横向左侧)时,应用程序看起来不错。
为了iPad调用
application(_:supportedInterfaceOrientationsFor),在Info.plist中,只保留肖像iPad。该应用程序将失去 Slide Over + Split View 功能。但是您可以在一个地方锁定或解锁任何视图控制器的方向,无需修改 ViewController class.最后,当视图为 displayed/removed 时,此函数在视图控制器的生命周期中被调用。如果您的应用在其他时间需要 lock/unlock/change 方向,它可能无法工作
Swift 4/5
var orientationLock = UIInterfaceOrientationMask.all
func application(_ application: UIApplication, supportedInterfaceOrientationsFor window: UIWindow?) -> UIInterfaceOrientationMask {
return self.orientationLock
}
struct AppUtility {
static func lockOrientation(_ orientation: UIInterfaceOrientationMask) {
if let delegate = UIApplication.shared.delegate as? AppDelegate {
delegate.orientationLock = orientation
}
}
static func lockOrientation(_ orientation: UIInterfaceOrientationMask, andRotateTo rotateOrientation:UIInterfaceOrientation) {
self.lockOrientation(orientation)
UIDevice.current.setValue(rotateOrientation.rawValue, forKey: "orientation")
}
}
你的ViewController 如果您只需要纵向,请添加以下行。您必须将此应用于所有 ViewController 需要显示纵向模式。
override func viewWillAppear(_ animated: Bool) {
AppDelegate.AppUtility.lockOrientation(UIInterfaceOrientationMask.portrait, andRotateTo: UIInterfaceOrientation.portrait)
}
和 这将使其他人的屏幕方向 Viewcontroller 根据设备的物理方向。
override func viewWillDisappear(_ animated: Bool) {
AppDelegate.AppUtility.lockOrientation(UIInterfaceOrientationMask.all)
}
使用
创建新扩展import UIKit
extension UINavigationController {
override open var supportedInterfaceOrientations: UIInterfaceOrientationMask {
return .portrait
}
}
extension UITabBarController {
override open var supportedInterfaceOrientations: UIInterfaceOrientationMask {
return .portrait
}
}
实际测试的解决方案。在我的示例中,我需要我的整个应用程序应处于纵向模式,但只有一个屏幕的方向应处于横向模式。
AppDelegate 中的代码如上述答案所述。
var orientationLock = UIInterfaceOrientationMask.all
func application(_ application: UIApplication, supportedInterfaceOrientationsFor window: UIWindow?) -> UIInterfaceOrientationMask
{
return self.orientationLock
}
struct AppUtility {
static func lockOrientation(_ orientation: UIInterfaceOrientationMask) {
if let delegate = UIApplication.shared.delegate as? AppDelegate {
delegate.orientationLock = orientation
}
}
static func lockOrientation(_ orientation: UIInterfaceOrientationMask, andRotateTo rotateOrientation:UIInterfaceOrientation) {
self.lockOrientation(orientation)
UIDevice.current.setValue(rotateOrientation.rawValue, forKey: "orientation")
}
}
然后在横向 viewcontroller 变为 presented/push 之前写下这段代码。
override func viewWillAppear(_ animated: Bool) {
super.viewWillAppear(animated)
AppDelegate.AppUtility.lockOrientation(UIInterfaceOrientationMask.portrait, andRotateTo: UIInterfaceOrientation.portrait)
}
然后实际写下这段代码viewcontroller(横屏)
override func viewWillAppear(_ animated: Bool) {
super.viewWillAppear(animated)
AppDelegate.AppUtility.lockOrientation(UIInterfaceOrientationMask.landscape, andRotateTo: UIInterfaceOrientation.landscape)
}
Swift 3 & 4
像这样设置特定 UIViewController 的 supportedInterfaceOrientations 属性:
class MyViewController: UIViewController {
var orientations = UIInterfaceOrientationMask.portrait //or what orientation you want
override var supportedInterfaceOrientations : UIInterfaceOrientationMask {
get { return self.orientations }
set { self.orientations = newValue }
}
override func viewDidLoad() {
super.viewDidLoad()
}
//...
}
更新
只有当您的 viewController 而不是 嵌入 UINavigationController 时,此解决方案才有效,因为方向继承自父 viewController。
对于这种情况,您可以创建 UINavigationViewController 的子类并在其上设置这些属性。
这是一个适用于 Swift 4.2 (iOS 12.2) 的简单方法,将其放入要禁用 shouldAutorotate 的 UIViewController 中:
override var supportedInterfaceOrientations: UIInterfaceOrientationMask {
return .portrait
}
.portrait 部分告诉它要保持哪个方向,您可以根据需要更改它。选项有:.portrait、.all、.allButUpsideDown、.landscape、.landscapeLeft、.landscapeRight、.portraitUpsideDown、
我做了一些实验,并设法找到了解决这个问题的完美方法。 该方法基于通过 view->tag
进行的视图标记在目标 ViewController 中,只需将标签分配给根视图,如以下代码示例所示:
class MyViewController: BaseViewController {
// declare unique view tag identifier
static let ViewTag = 2105981;
override func viewDidLoad()
{
super.viewDidLoad();
// assign the value to the current root view
self.view.tag = MyViewController.ViewTag;
}
最后在 AppDelegate.swift 检查当前显示的视图是否是我们标记的视图:
func application(_ application: UIApplication, supportedInterfaceOrientationsFor window: UIWindow?) -> UIInterfaceOrientationMask
{
if (window?.viewWithTag(DesignerController.ViewTag)) != nil {
return .portrait;
}
return .all;
}
这种方法已经在我的模拟器上进行了测试,似乎工作正常。
注意: 如果当前 MVC 与导航堆栈中的某个子 ViewController 重叠,也会找到标记的视图。
对于 Swift 的新版本试试这个
override var shouldAutorotate: Bool {
return false
}
override var supportedInterfaceOrientations: UIInterfaceOrientationMask {
return UIInterfaceOrientationMask.portrait
}
override var preferredInterfaceOrientationForPresentation: UIInterfaceOrientation {
return UIInterfaceOrientation.portrait
}
纵向和横向锁定和更改方向的最佳解决方案:
在 YouTube 上观看此视频:
https://m.youtube.com/watch?v=4vRrHdBowyo
这个教程最好而且简单。
或使用以下代码:
See this picture
// 1- 在第二个 viewcontroller 中我们设置 landscapeleft,在第一个 viewcontroller 中我们设置 portrat:
// 2- 如果你使用 NavigationController,你应该添加扩展
import UIKit
class SecondViewController: UIViewController {
override func viewWillAppear(_ animated: Bool) {
super.viewWillAppear(animated)
UIDevice.current.setValue(UIInterfaceOrientation.landscapeLeft.rawValue, forKey: "orientation")
}
override open var shouldAutorotate: Bool {
return false
}
override open var supportedInterfaceOrientations: UIInterfaceOrientationMask {
return .landscapeLeft
}
override var preferredInterfaceOrientationForPresentation: UIInterfaceOrientation {
return .landscapeLeft
}
override func viewDidLoad() {
super.viewDidLoad()
}
//write The rest of your code in here
}
//if you use NavigationController, you should add this extension
extension UINavigationController {
override open var supportedInterfaceOrientations: UIInterfaceOrientationMask {
return topViewController?.supportedInterfaceOrientations ?? .allButUpsideDown
}
}