如何将响应式导航栏上的菜单图标动画化为 x 图标?
How do I make a menu icon on a responsive navigation bar animated into an x icon?
我正在制作我的第一个网络应用程序,并且正在制作顶部导航栏。我正在让它响应,菜单图标仅在屏幕宽度小于 600 像素时显示。我希望菜单图标在单击后变成 X 图标,但我不太确定该怎么做。
下面是我的导航栏代码。
'''
    <!DOCTYPE html>
    <html>
    <head>
<meta name="viewport" content="width=device-width, initial-scale=1">
<link rel="stylesheet" href="https://cdnjs.cloudflare.com/ajax/libs/font-awesome/4.7.0/css/font-awesome.min.css">
<style>
    body {margin:0;font-family:"Trebuchet MS"}

    .topnav {
        overflow: hidden;
        background-color: #333;
    }

    .topnav a {
        float: left;
        display: block;
        color: #f2f2f2;
        text-align: center;
        padding: 14px 16px;
        text-decoration: none;
        font-size: 17px;
    }

    .active {
        background-color: #4C00AF;
        color: white;
    }

    .topnav .icon {
        display: none;
    }

    .dropdown {
        float: left;
        overflow: hidden;
    }

    .dropdown .dropbtn {
        font-size: 17px;
        border: none;
        outline: none;
        color: white;
        padding: 14px 16px;
        background-color: inherit;
        font-family: inherit;
        margin: 0;
    }

    .dropdown-content {
        display: none;
        position: absolute;
        background-color: #f9f9f9;
        min-width: 160px;
        box-shadow: 0px 8px 16px 0px rgba(0,0,0,0.2);
        z-index: 1;
    }

    .dropdown-content a {
        float: none;
        color: black;
        padding: 12px 16px;
        text-decoration: none;
        display: block;
        text-align: left;
    }

    .topnav a:hover, .dropdown:hover .dropbtn {
        background-color: #554647;
        color: white;
    }

    .dropdown-content a:hover {
        background-color: #ddd;
        color: black;
    }

    .dropdown:hover .dropdown-content {
        display: block;
    }

    @media screen and (max-width: 600px) {
        .topnav a:not(:first-child), .dropdown .dropbtn {
            display: none;
        }
        .topnav a.icon {
            float: right;
            display: block;
        }
    }

    @media screen and (max-width: 600px) {
        .topnav.responsive {position: relative;}
        .topnav.responsive .icon {
            position: absolute;
            right: 0;
            top: 0;
        }
        .topnav.responsive a {
            float: none;
            display: block;
            text-align: left;
        }
        .topnav.responsive .dropdown {float: none;}
        .topnav.responsive .dropdown-content {position: relative;}
        .topnav.responsive .dropdown .dropbtn {
            display: block;
            width: 100%;
            text-align: left;
        }
    }
</style>
<div class="topnav" id="myTopnav">
<a href="#home" class="active">Home</a>
<a href="#contact">Page2</a>
<div class="dropdown">
<button class="dropbtn">About
<i class="fa fa-caret-down"></i>
</button>
<div class="dropdown-content">
<a href="#">Hello</a>
<a href="#">Salutations</a>
<a href="#">Hi</a>
</div>
</div>
<a href="javascript:void(0);" style="font-size:15px;" class="icon"
onclick="myFunction()">☰</a>
</div>
<script>
function myFunction() {
var x = document.getElementById("myTopnav");
if (x.className === "topnav") {
x.className += " responsive";
} else {
x.className = "topnav";
}
}
</script>
</body>
</html>
'''
谢谢!
简单动画菜单按钮的代码
HTML
<button class="menu-btn" id="menu-icon">
  <div class="btn-line"></div>
</button>
CSS
.menu-btn {
  width: 40px;
  height: 40px;
  background: none;
  border: 0;
}

.menu-btn,
.btn-line {
  display: flex;
  flex-direction: column;
  justify-content: center;
  align-items: center;
}

.btn-line,
.btn-line::before,
.btn-line::after {
  width: 35px;
  height: 5px;
  border-radius: 4px;
  background: white;
  transition: all .5s;
}

.btn-line {
  position: relative;
}

.btn-line::before,
.btn-line::after {
  position: absolute;
  content: '';
  top: -11px;
}

.btn-line::after {
  top: 11px;
}

.close > .btn-line {
  transform: rotate(225deg);
  background: red;
}

.close > .btn-line::before,
.close > .btn-line::after {
  top: 0;
  transform: rotate(90deg);
  background: red;
}
JS
const btn = document.getElementById('menu-icon');
btn.addEventListener('click', (e) => {
  e.target.classList.toggle('close');
});
这对我有用
理论
CSS 提供所有必要的动画工具。基本上发生的事情是这样的:
- 顶线和底线必须旋转形成 X
- 中线必须消失
X 会比汉堡线更高更窄,所以:
- 顶部和中间的线必须垂直向右移出以保持其中心
申请
/* Define the shape and color of the hamburger lines */
.navbar-toggler span {
    display: block;
    background-color: #4f4f4f;
    height: 3px;
    width: 25px;
    margin-top: 5px;
    margin-bottom: 5px;
    position: relative;
    left: 0;
    opacity: 1;
    transition: all 0.35s ease-out;
    transform-origin: center left;
}


/* top line needs a little padding */
.navbar-toggler span:nth-child(1) {
    margin-top: 0.3em;
}

/**
 * Animate collapse into X.
 */

/* top line rotates 45 degrees clockwise and moves up and in a bit to close the center of the X in the center of the button */
.navbar-toggler:not(.collapsed) span:nth-child(1) {
    transform: translate(15%, -33%) rotate(45deg);
}
/* center line goes transparent */
.navbar-toggler:not(.collapsed) span:nth-child(2) {
    opacity: 0;
}
/* bottom line rotates 45 degrees counter clockwise, in, and down a bit to close the center of the X in the center of the button  */
.navbar-toggler:not(.collapsed) span:nth-child(3) {
    transform: translate(15%, 33%) rotate(-45deg) ;
}


/**
 * Animate collapse open into hamburger menu
 */

/* top line moves back to initial position and rotates back to 0 degrees */
.navbar-toggler span:nth-child(1) {
    transform: translate(0%, 0%) rotate(0deg) ;
}
/* middle line goes back to regular color and opacity */
.navbar-toggler span:nth-child(2) {
    opacity: 1;
}
/* bottom line goes back to initial position and rotates back to 0 degrees */
.navbar-toggler span:nth-child(3) {
    transform: translate(0%, 0%) rotate(0deg) ;
}
<script src="https://code.jquery.com/jquery-3.5.1.slim.min.js"></script>
<script src="https://stackpath.bootstrapcdn.com/bootstrap/4.5.2/js/bootstrap.min.js"></script>
<link href="https://stackpath.bootstrapcdn.com/bootstrap/4.5.2/css/bootstrap.min.css" rel="stylesheet"/>

<!-- Bootstrap Navigation -->
<nav class="navbar bg-light">
        <a class="navbar-toggler collapsed border-0" type="button" data-toggle="collapse" data-target="#collapsingNavbar">
            <span> </span>
            <span> </span>
            <span> </span>
        </a>
        <a class="navbar-brand" href="./">
            Brand
        </a>
        <div class="collapse navbar-collapse" id="collapsingNavbar">
            <ul class="nav navbar-nav">
                <li class="nav-item">
                    <a class="nav-link" href="#">About</a>
                </li>
                <li class="nav-item">
                    <a class="nav-link" href="#">Contact</a>
                </li>
            </ul>
        </div>
</nav>
<main class="container">
    <h1>Content Here</h1>
    <p>Shrink the viewport if to expose the hamburger menu.</p>
</main>
是什么让它起作用
具体来说,由于顶线和底线旋转45度形成X,它们的中心线占宽度的70%,所以它们必须向内移动15%。这可以使用毕达哥拉斯定理计算。
碰巧,我们的汉堡菜单是 26x21 像素,比高度宽 24%,但是当您将线条移动到位并考虑线条的高度时,X 最终变成 20x20 正方形(这里定义为 3px)。
在这个特定的实现中,我们将每条线的旋转点定义为 center-left。这会影响我们将线条向上移动多少,因为这些线条大约有 3px 高,它们每条都会增加大约 (2.1/2)=1.05px 到 X 的高度,或者大约是 X 高度的 33%。
因此 33% 是他们必须垂直向外移动多少,这样两条线在 X 的中心相交并形成一个 20x20px 的正方形。
自定义
X 总是会形成一个正方形,因此要了解将它们移动多少,您只需要知道 <span> 条形的宽度和高度以及生成的汉堡包图标的高度。
将这些数字代入这个等式:
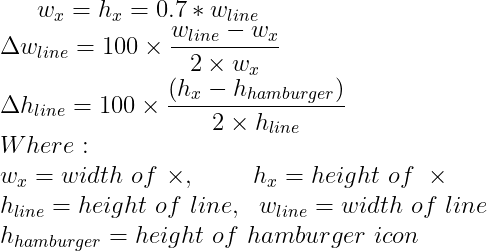
或者在代码中:
const line_width = 26; // px
const line_height = 3; // px
const hamburger_height = 21; // px

const x_width = x_height = 0.8 * line_width;
const line_move_y_percent = 100 * (line_width - x_width) / (2 * line_height)
const line_move_right_percent = 100 * (x_height - hamburger_height) / (2 * line_height)
我正在制作我的第一个网络应用程序,并且正在制作顶部导航栏。我正在让它响应,菜单图标仅在屏幕宽度小于 600 像素时显示。我希望菜单图标在单击后变成 X 图标,但我不太确定该怎么做。
下面是我的导航栏代码。
'''
<!DOCTYPE html>
<html>
<head>
<meta name="viewport" content="width=device-width, initial-scale=1">
<link rel="stylesheet" href="https://cdnjs.cloudflare.com/ajax/libs/font-awesome/4.7.0/css/font-awesome.min.css">
<style>
body {margin:0;font-family:"Trebuchet MS"}
.topnav {
overflow: hidden;
background-color: #333;
}
.topnav a {
float: left;
display: block;
color: #f2f2f2;
text-align: center;
padding: 14px 16px;
text-decoration: none;
font-size: 17px;
}
.active {
background-color: #4C00AF;
color: white;
}
.topnav .icon {
display: none;
}
.dropdown {
float: left;
overflow: hidden;
}
.dropdown .dropbtn {
font-size: 17px;
border: none;
outline: none;
color: white;
padding: 14px 16px;
background-color: inherit;
font-family: inherit;
margin: 0;
}
.dropdown-content {
display: none;
position: absolute;
background-color: #f9f9f9;
min-width: 160px;
box-shadow: 0px 8px 16px 0px rgba(0,0,0,0.2);
z-index: 1;
}
.dropdown-content a {
float: none;
color: black;
padding: 12px 16px;
text-decoration: none;
display: block;
text-align: left;
}
.topnav a:hover, .dropdown:hover .dropbtn {
background-color: #554647;
color: white;
}
.dropdown-content a:hover {
background-color: #ddd;
color: black;
}
.dropdown:hover .dropdown-content {
display: block;
}
@media screen and (max-width: 600px) {
.topnav a:not(:first-child), .dropdown .dropbtn {
display: none;
}
.topnav a.icon {
float: right;
display: block;
}
}
@media screen and (max-width: 600px) {
.topnav.responsive {position: relative;}
.topnav.responsive .icon {
position: absolute;
right: 0;
top: 0;
}
.topnav.responsive a {
float: none;
display: block;
text-align: left;
}
.topnav.responsive .dropdown {float: none;}
.topnav.responsive .dropdown-content {position: relative;}
.topnav.responsive .dropdown .dropbtn {
display: block;
width: 100%;
text-align: left;
}
}
</style>
<div class="topnav" id="myTopnav">
<a href="#home" class="active">Home</a>
<a href="#contact">Page2</a>
<div class="dropdown">
<button class="dropbtn">About
<i class="fa fa-caret-down"></i>
</button>
<div class="dropdown-content">
<a href="#">Hello</a>
<a href="#">Salutations</a>
<a href="#">Hi</a>
</div>
</div>
<a href="javascript:void(0);" style="font-size:15px;" class="icon"
onclick="myFunction()">☰</a>
</div>
<script>
function myFunction() {
var x = document.getElementById("myTopnav");
if (x.className === "topnav") {
x.className += " responsive";
} else {
x.className = "topnav";
}
}
</script>
</body>
</html>
'''
谢谢!
简单动画菜单按钮的代码
HTML
<button class="menu-btn" id="menu-icon">
<div class="btn-line"></div>
</button>
CSS
.menu-btn {
width: 40px;
height: 40px;
background: none;
border: 0;
}
.menu-btn,
.btn-line {
display: flex;
flex-direction: column;
justify-content: center;
align-items: center;
}
.btn-line,
.btn-line::before,
.btn-line::after {
width: 35px;
height: 5px;
border-radius: 4px;
background: white;
transition: all .5s;
}
.btn-line {
position: relative;
}
.btn-line::before,
.btn-line::after {
position: absolute;
content: '';
top: -11px;
}
.btn-line::after {
top: 11px;
}
.close > .btn-line {
transform: rotate(225deg);
background: red;
}
.close > .btn-line::before,
.close > .btn-line::after {
top: 0;
transform: rotate(90deg);
background: red;
}
JS
const btn = document.getElementById('menu-icon');
btn.addEventListener('click', (e) => {
e.target.classList.toggle('close');
});
这对我有用
理论
CSS 提供所有必要的动画工具。基本上发生的事情是这样的:
- 顶线和底线必须旋转形成 X
- 中线必须消失
X 会比汉堡线更高更窄,所以:
- 顶部和中间的线必须垂直向右移出以保持其中心
申请
/* Define the shape and color of the hamburger lines */
.navbar-toggler span {
display: block;
background-color: #4f4f4f;
height: 3px;
width: 25px;
margin-top: 5px;
margin-bottom: 5px;
position: relative;
left: 0;
opacity: 1;
transition: all 0.35s ease-out;
transform-origin: center left;
}
/* top line needs a little padding */
.navbar-toggler span:nth-child(1) {
margin-top: 0.3em;
}
/**
* Animate collapse into X.
*/
/* top line rotates 45 degrees clockwise and moves up and in a bit to close the center of the X in the center of the button */
.navbar-toggler:not(.collapsed) span:nth-child(1) {
transform: translate(15%, -33%) rotate(45deg);
}
/* center line goes transparent */
.navbar-toggler:not(.collapsed) span:nth-child(2) {
opacity: 0;
}
/* bottom line rotates 45 degrees counter clockwise, in, and down a bit to close the center of the X in the center of the button */
.navbar-toggler:not(.collapsed) span:nth-child(3) {
transform: translate(15%, 33%) rotate(-45deg) ;
}
/**
* Animate collapse open into hamburger menu
*/
/* top line moves back to initial position and rotates back to 0 degrees */
.navbar-toggler span:nth-child(1) {
transform: translate(0%, 0%) rotate(0deg) ;
}
/* middle line goes back to regular color and opacity */
.navbar-toggler span:nth-child(2) {
opacity: 1;
}
/* bottom line goes back to initial position and rotates back to 0 degrees */
.navbar-toggler span:nth-child(3) {
transform: translate(0%, 0%) rotate(0deg) ;
}
<script src="https://code.jquery.com/jquery-3.5.1.slim.min.js"></script>
<script src="https://stackpath.bootstrapcdn.com/bootstrap/4.5.2/js/bootstrap.min.js"></script>
<link href="https://stackpath.bootstrapcdn.com/bootstrap/4.5.2/css/bootstrap.min.css" rel="stylesheet"/>
<!-- Bootstrap Navigation -->
<nav class="navbar bg-light">
<a class="navbar-toggler collapsed border-0" type="button" data-toggle="collapse" data-target="#collapsingNavbar">
<span> </span>
<span> </span>
<span> </span>
</a>
<a class="navbar-brand" href="./">
Brand
</a>
<div class="collapse navbar-collapse" id="collapsingNavbar">
<ul class="nav navbar-nav">
<li class="nav-item">
<a class="nav-link" href="#">About</a>
</li>
<li class="nav-item">
<a class="nav-link" href="#">Contact</a>
</li>
</ul>
</div>
</nav>
<main class="container">
<h1>Content Here</h1>
<p>Shrink the viewport if to expose the hamburger menu.</p>
</main>
是什么让它起作用
具体来说,由于顶线和底线旋转45度形成X,它们的中心线占宽度的70%,所以它们必须向内移动15%。这可以使用毕达哥拉斯定理计算。
碰巧,我们的汉堡菜单是 26x21 像素,比高度宽 24%,但是当您将线条移动到位并考虑线条的高度时,X 最终变成 20x20 正方形(这里定义为 3px)。
在这个特定的实现中,我们将每条线的旋转点定义为 center-left。这会影响我们将线条向上移动多少,因为这些线条大约有 3px 高,它们每条都会增加大约 (2.1/2)=1.05px 到 X 的高度,或者大约是 X 高度的 33%。
因此 33% 是他们必须垂直向外移动多少,这样两条线在 X 的中心相交并形成一个 20x20px 的正方形。
自定义
X 总是会形成一个正方形,因此要了解将它们移动多少,您只需要知道 <span> 条形的宽度和高度以及生成的汉堡包图标的高度。
将这些数字代入这个等式:
或者在代码中:
const line_width = 26; // px
const line_height = 3; // px
const hamburger_height = 21; // px
const x_width = x_height = 0.8 * line_width;
const line_move_y_percent = 100 * (line_width - x_width) / (2 * line_height)
const line_move_right_percent = 100 * (x_height - hamburger_height) / (2 * line_height)